The Step-by-Step Guide to Making a Flexible Visual Schedule That Fits Your Family’s Flow
Nov 25, 2025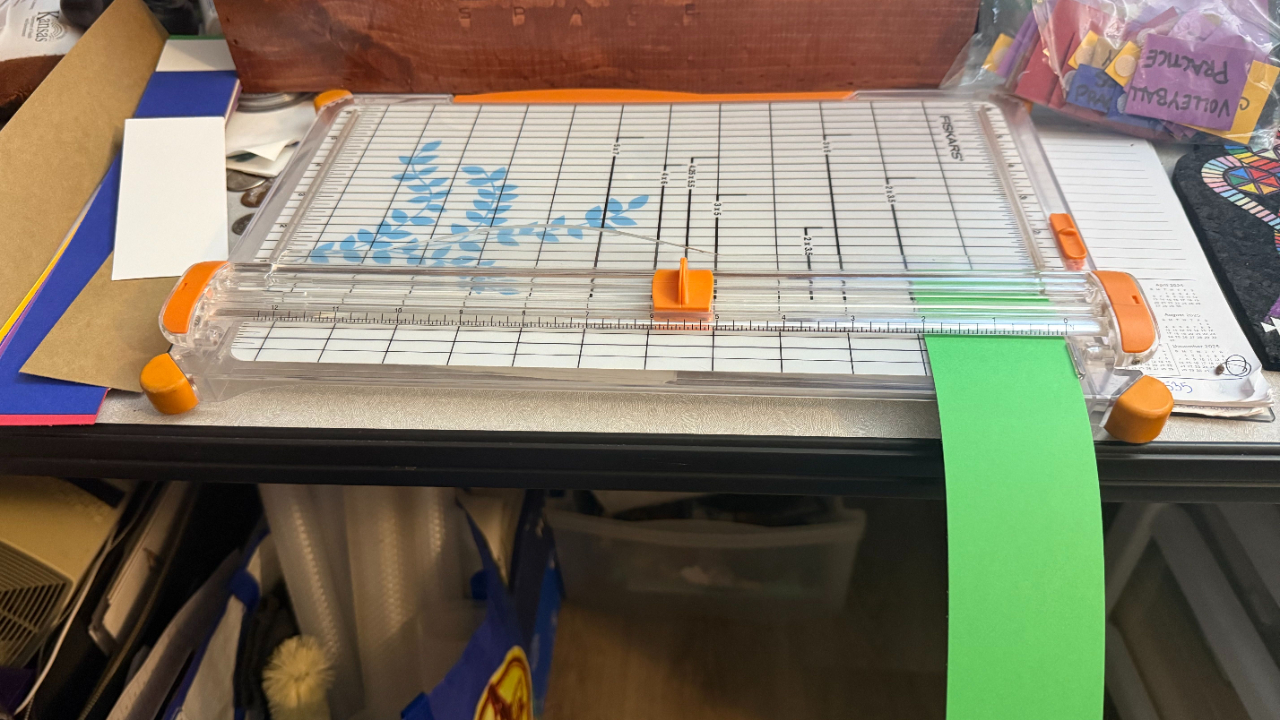
For moms with more than three kids who need predictability, peace, and a plan that actually works — even when every day looks a little (or a lot) different.
Introduction: Why Our Family Needed Visual Structure
If you’re anything like me, you’ve gone through seasons where the days feel like a blur of “What’s next?” and “How long until we ____?” and “Mom, when are we leaving?”
Before I ever created my first visual schedule, I knew I needed some kind of structure at home. Not strict, not rigid — just anchoring. Something my kids could see, touch, and rely on. Something that gave them the predictability they craved (even the ones who claim they “don’t care” about schedules). Something that kept me sane when I was juggling babies, toddlers, and preschoolers.
So I started with the most humble system you've ever seen:
A cheap Walmart clock and a pack of Crayola markers.
Yep. That was version one.
And now, years later, we use a custom color-coded velcro board that hangs on the back of our front door — with different colored cards for each kid, weekly rhythms, quick setup, and the flexibility we need for a family of seven.
If you're curious how to build your own flexible visual schedule — or upgrade the one you’re struggling to maintain — this guide is for you.
Related Post:
If you want to see where this all began, check out “Visual Schedules That Actually Work”
My Visual Schedule Evolution (and What Each Stage Taught Me)
Stage 1: The Color-Coded Clock
Before my kids were in school, our days were predictable but chaotic in a different way. Breakfast, play time, outside time, nap time — but everything felt loose and I was constantly answering questions:
“Is it time to go outside yet?”
“When are we eating?”
“Are we doing crafts today?”
So I bought a cheap wall clock at Walmart and colored the clock face using Crayola markers. Blue for breakfast. Yellow for outside play. Green for quiet time. Purple for lunch. You get the idea.
Suddenly my little ones could “read” our day — even if they couldn’t tell time.
Why it worked
-
It anchored our day with visual predictability.
-
Even toddlers could understand it.
-
It eliminated constant questions.
-
It gave the day helpful structure without the rigidity of a timed checklist.
Why we outgrew it
As the older kids began joining activities, this clock version couldn’t handle irregular days.
Doctor appointments?
Therapy?
A random Tuesday afternoon game?
There was no way to show that. It was too static.
And so we moved on.
Stage 2: The Weekly Dry Erase Board
Enter: The Weekly Planner Era.
I bought a simple dry erase board and turned it into a weekly grid. Seven days. One column. A list of activities.
Why it worked
-
It covered an entire week at once.
-
It supported new activities and appointments.
-
I could manually update it.
Why it didn’t work for long
It took FOREVER to rewrite each Sunday.
In theory, it was “simple.”
In reality, it was exhausting.
I’d sit down after the kids went to bed, stare at the blank columns, and think:
“Do I really have to rewrite ALL of this?”
I’d put it off.
Then forget.
Then things would get missed.
And eventually… I knew it was time for version three.
Stage 3: The Velcro Board That Saved My Sanity
This was my breakthrough system — and the one we still use today.
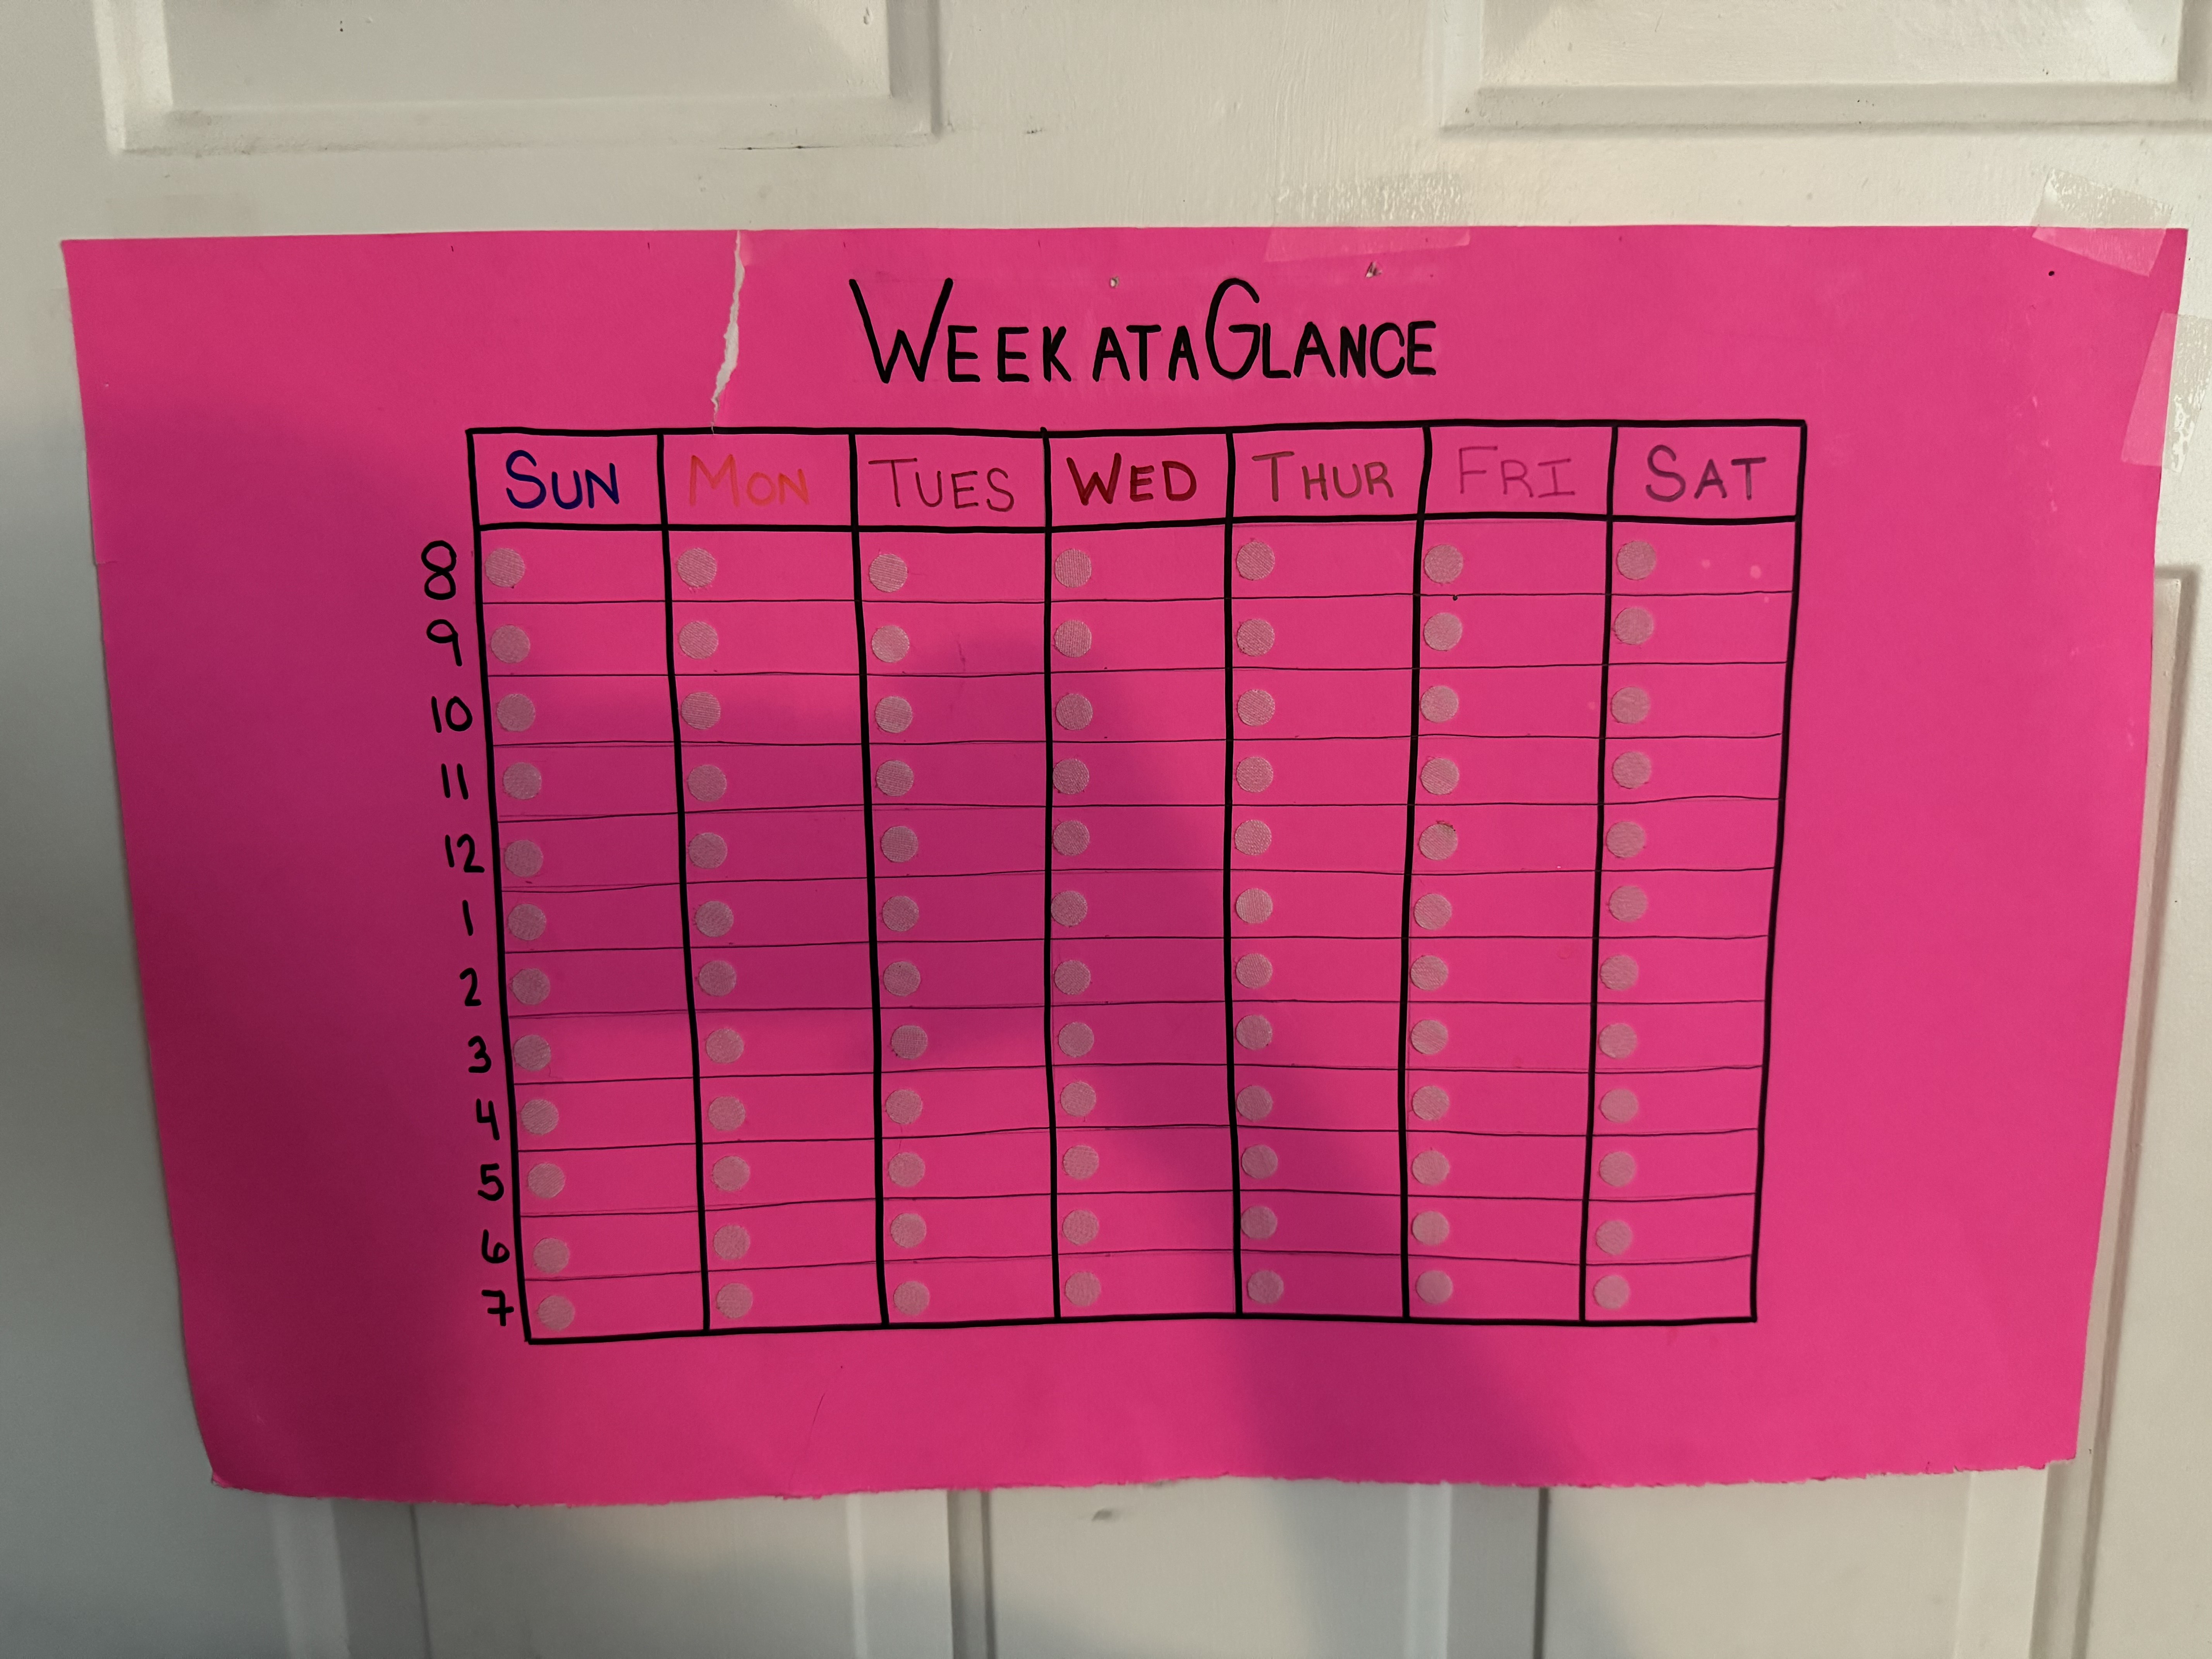
I took a half-poster board, divided it into one-hour blocks (8am–8pm), and covered each time slot with velcro. Then I made small cards for every repeating event in our lives.
Each person has a color:
-
Purple — Kaydence
-
Brown — Harmony
-
Red — Odin
-
Blue — Villi
-
Yellow — Ivaldi
-
Green — Me
-
White — All kids / family events
Every recurring activity got its own card:
-
School
-
Church
-
Therapy
-
Sports practices
-
Games
-
Play dates
-
Picture day
-
Appointments
I keep them in a Ziploc bag on my desk — which makes resetting the board unbelievably fast.
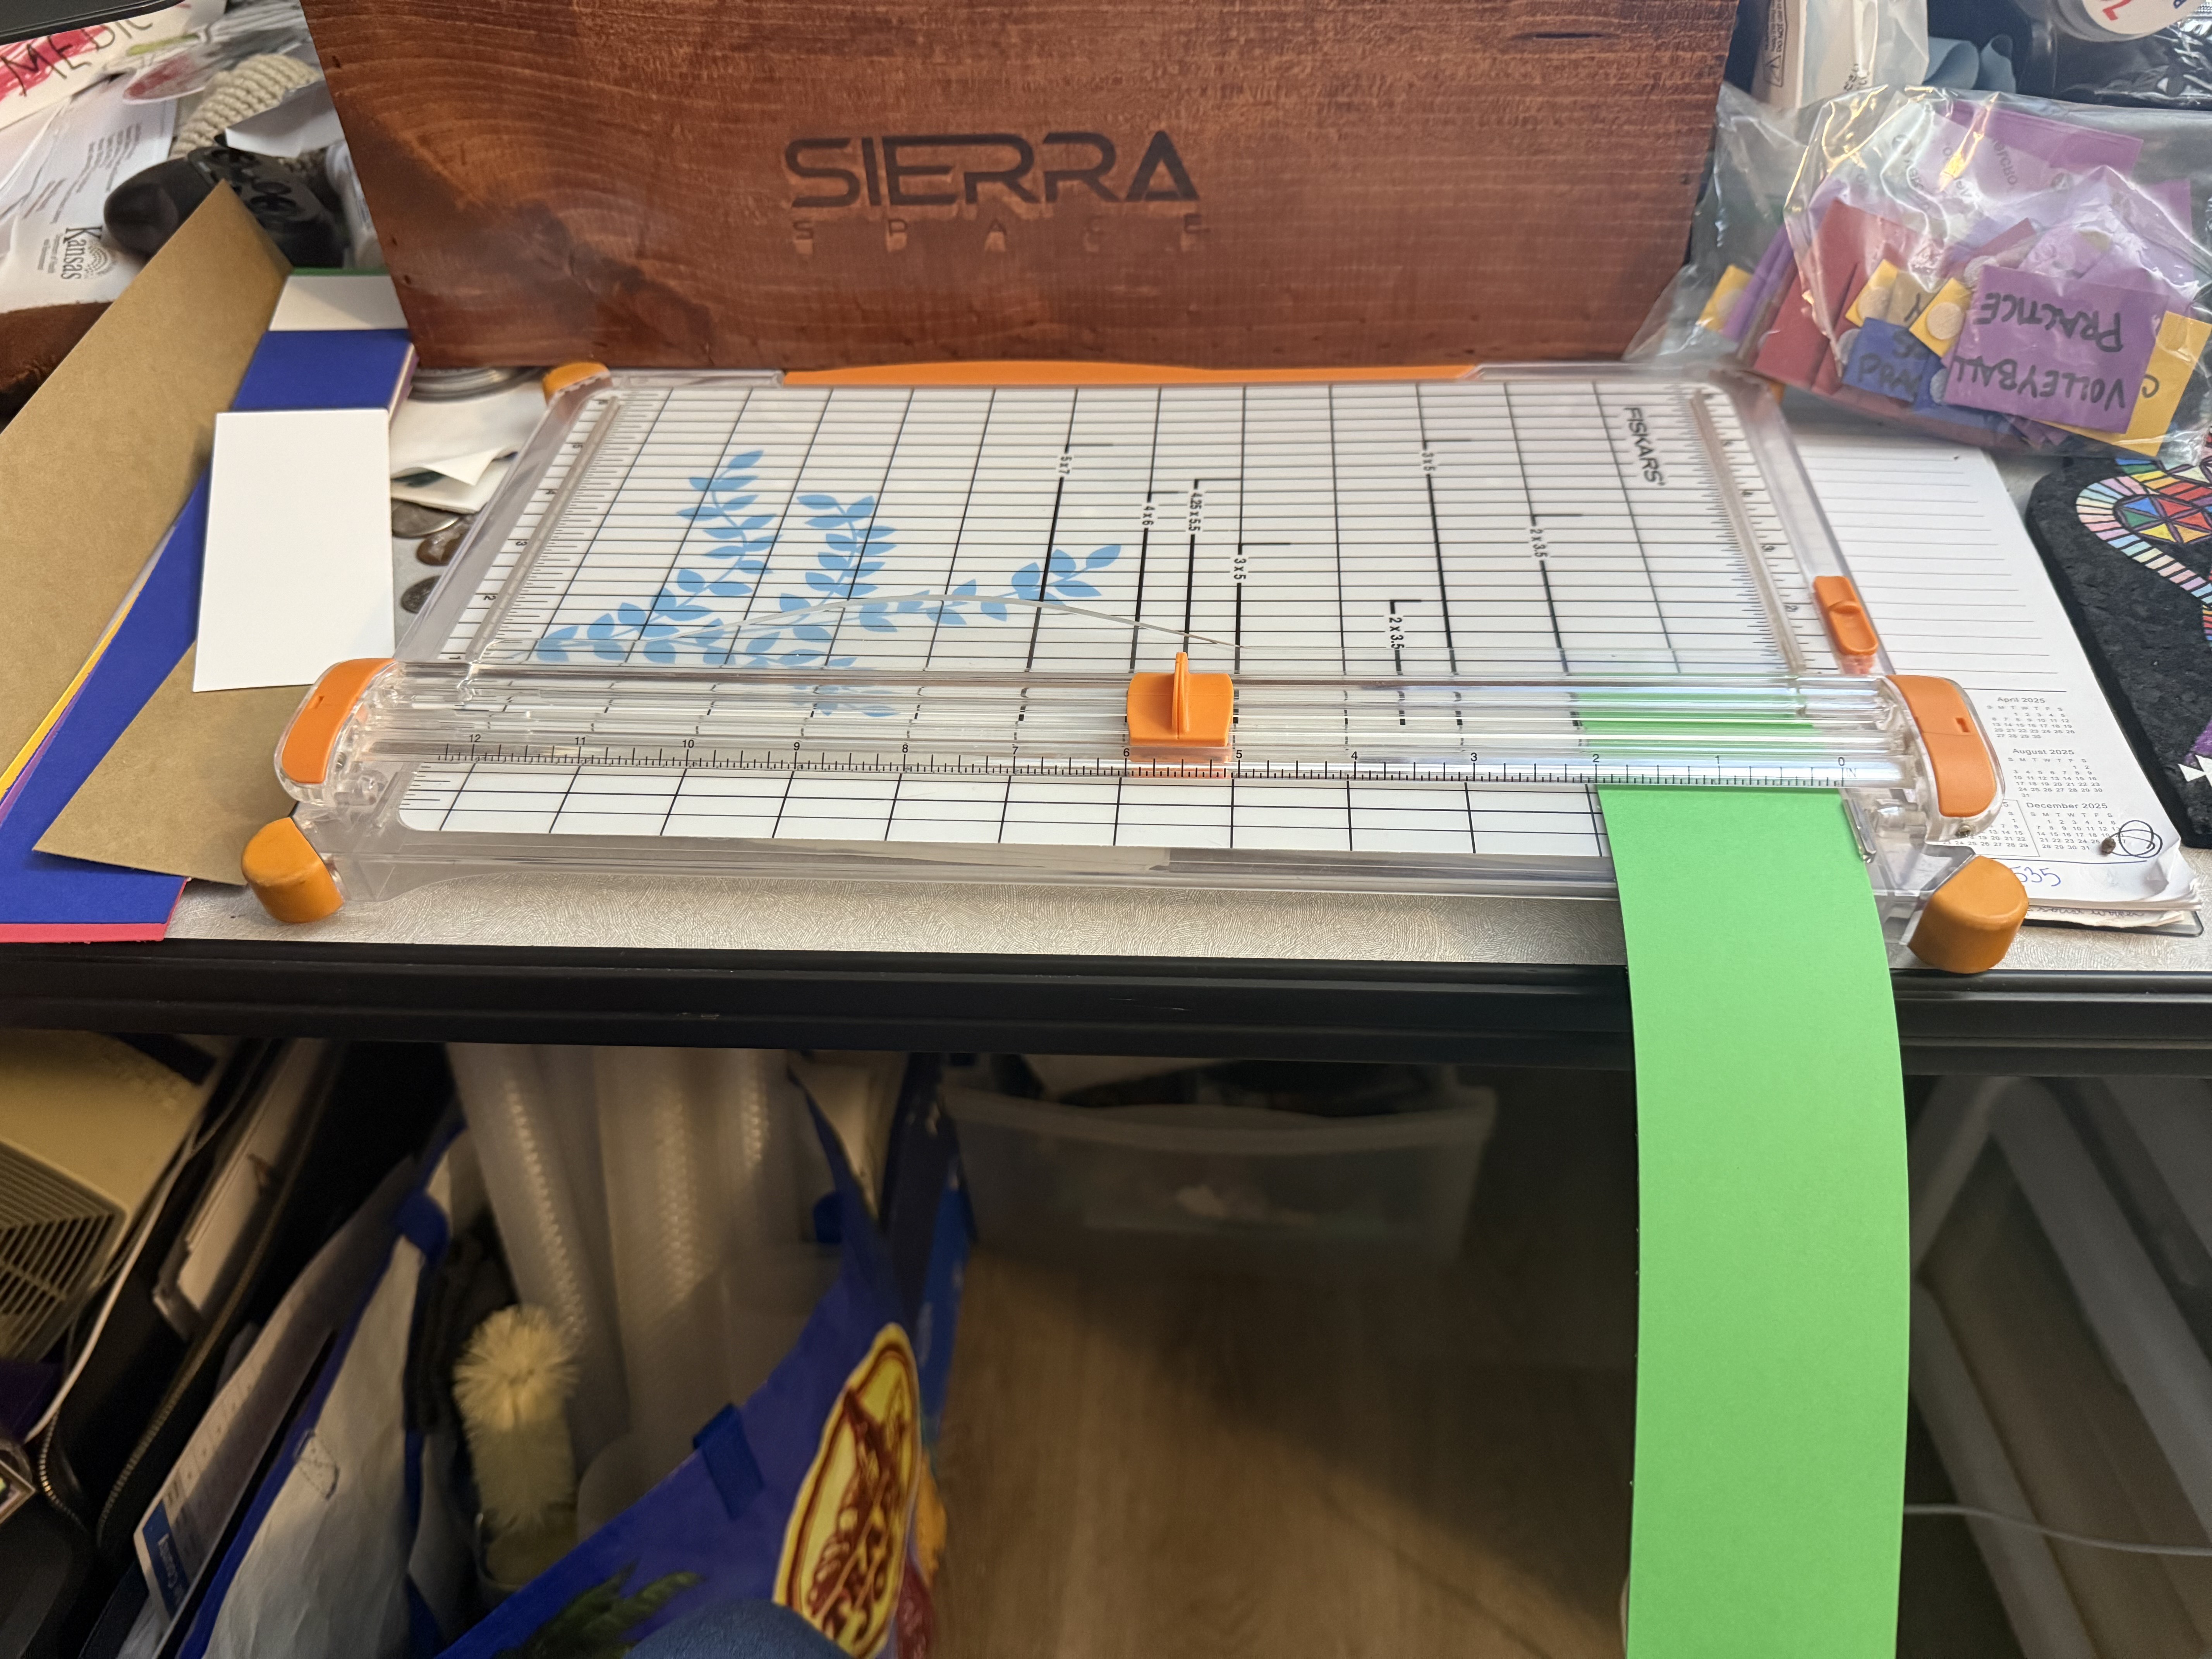
Want to See What It Looks Like?
Empty Board
Creating the Event Cards
This Week’s Filled Board
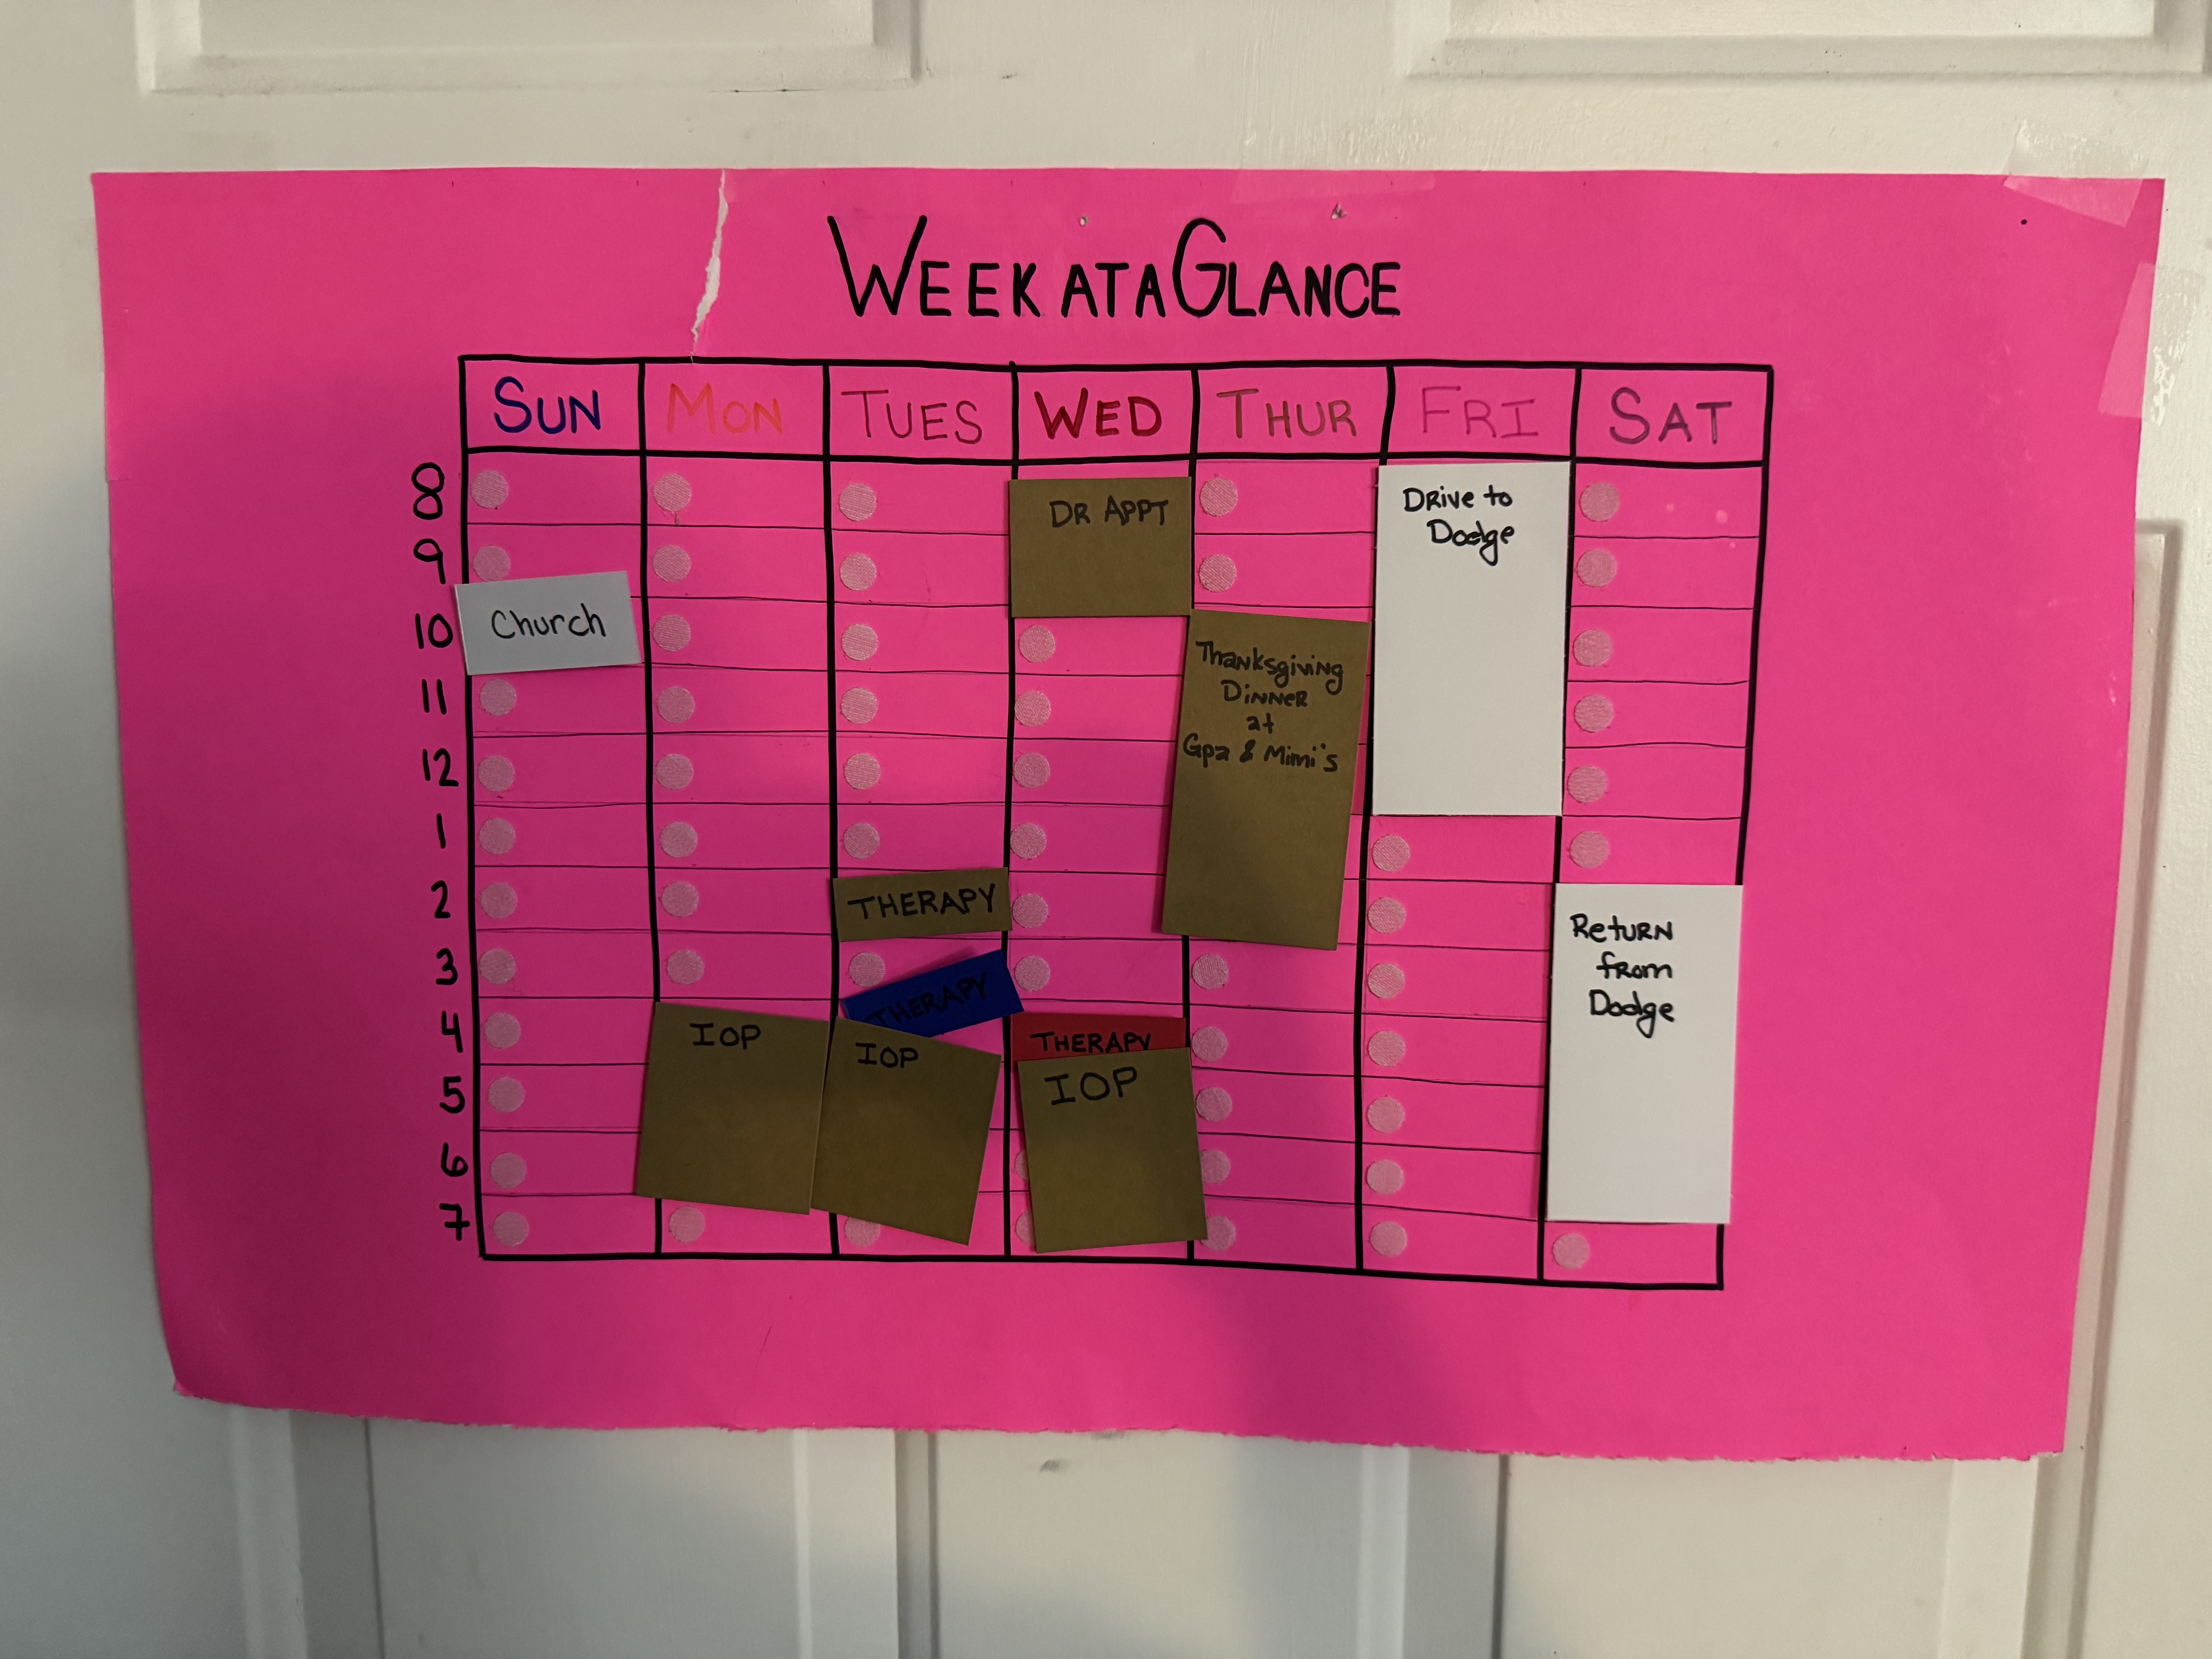
Why This Version Works So Well (Especially for Big Families)
1. It’s fast to reset (10 minutes tops).
On Sunday nights, during my weekly planning time, I pull out the Ziploc bag, check my shared digital calendar, and grab whatever cards I need. New event? I cut a new card — which takes maybe 30 seconds.
Done.
2. The kids check it themselves.
This is huge.
At least once a week, my kids gather around the board:
-
“Do I have soccer this week?”
-
“What time is my therapy on Wednesday?”
-
“Are we doing a family activity today?”
They grab answers without asking me — which reduces mental load and lets them feel more independent.
3. It’s expandable, even if not perfect.
Originally, the time slots were 8am–8pm. When the kids were little, that was perfect. Now? School starts at 7am, and some activities go until 10pm.
The board still works — but it’s starting to show its age. And honestly?
I’m ready to level up again.
Stage 4 (Coming Soon): The Digital Dream — Cozyla Calendar+ 2 32" model
As much as I love my velcro board, I can feel the future calling.
I want something that:
-
Syncs with our online calendars
-
Lets my girls add their own events
-
Updates instantly across devices
-
Still offers a visual hub the kids can reference
-
Reduces the Sunday-night maintenance
In short: I want a Cozyla Calendar+ 2.
It’s the next evolution — a hybrid of digital convenience and family-level visibility. When I upgrade, I’ll share the whole process and integrate it into another blog post. But for now, the velcro board remains our hero.
How to Create Your Own Flexible Visual Schedule (Step-by-Step)
This guide walks you through building the same system I use — adaptable for families with toddlers, school-aged kids, teens, and mixed ages.
Step 1: Choose Your Base Board
You can use:
-
A poster board
-
A half-poster board (my favorite)
-
A tri-fold board
-
A magnetic board
-
A corkboard
Pro tip: Half-poster size works great on the back of a door without dominating the whole room.
Step 2: Divide Your Day Into Time Blocks
Start with hourly blocks. You can adjust later.
My recommendation:
-
7am–9pm for school-age families
-
8am–8pm for toddlers
-
6am–10pm if you have teens (or early workouts)
Use a ruler and a black marker for clean lines.
Step 3: Add Velcro
Put the soft side (loop) on the board.
Put the rough side (hook) on the cards.
Spacing tip: One dot per time slot is usually enough.
Step 4: Choose Your Color Coding
Assign a color to each child and parent. This instantly makes the system visually intuitive.
My family colors:
-
Purple — Kaydence
-
Brown — Harmony
-
Red — Odin
-
Blue — Villi
-
Yellow — Ivaldi
-
Green — Mom
-
White — All kids / family
Choose whatever palette works for you.
Step 5: Create Event Cards
Use construction paper or cardstock.
Make cards for:
-
School
-
Therapy
-
Church
-
Weekly sports
-
Music lessons
-
Appointments
-
Family events
-
Play dates
-
Work blocks (I don't include mine, because it's at the same time as school and I feel it would overwhelm the board. But I do add work events outside of the normal schedule, such as family days or evening meet ups with my team)
-
Date nights
Don’t overthink this — you can always add more later.
Step 6: Store Your Cards
You do not need a Pinterest-worthy system.
A simple:
✔️ Ziploc bag
✔️ Envelope
✔️ Small box
✔️ Drawer organizer
…works beautifully.
Step 7: Update Weekly — and Keep It Simple
Sunday night is my reset night.
You can choose:
-
Friday after school
-
Monday morning
-
Saturday morning planning
-
Or whatever matches your rhythm
The key is consistency.
Step 8: Teach Your Kids How to Use It
Tell them:
-
“This is where you check what we’re doing today.”
-
“This is where you find your practice times.”
-
“This is how you know what to wear tomorrow.”
Kids LOVE independence.
This board gives it to them.
Common Mistakes to Avoid
❌ Overcomplicating your cards
You don’t need fancy fonts or elaborate icons.
❌ Trying to plan too far ahead
This is a weekly system.
Don’t pre-plan the whole month.
❌ Setting it somewhere unreachable
Put it where the kids naturally walk past it.
❌ Forgetting to integrate your digital calendar
Even if you don’t have Cozyla+ yet, sync events with your phone calendar so nothing gets missed.
Tips for Making It Even More Effective
1. Add short icons for non-readers
A soccer ball, a book, a swim icon, a church doodle — stick-figure simple.
2. Laminate your cards
They last longer and look cleaner.
3. Make a “This Week’s Preparations” list
Put it beside the board so kids know what to pack or set out.
4. Use duplicates for busy seasons
If you have three kids in sports, make multiple practice cards.
How This System Supports a Family’s Emotional Needs
This board isn’t just about logistics.
It supports:
-
Predictability
-
Emotional regulation
-
Reduced anxiety
-
Independence
-
Self-confidence
-
Clear expectations
-
Less overwhelm for mom
In a large family, this is gold.
Kids feel safer when they know what to expect.
Moms feel calmer when the plan isn’t only in their heads.
And families run more smoothly when everyone has access to the same information.
Final Thoughts: Your Visual Schedule Should Serve You
Your system doesn’t need to look like mine. It doesn’t need to look like anyone else’s on the internet. You don’t need fancy printables or a huge wall setup.
You just need something that:
-
Fits your family
-
Is easy to update
-
Grows with you
-
Reduces your mental load
-
Creates shared ownership of the family rhythm
For us, that meant evolving through three versions — with one more upgrade on the horizon.
And if you’re in the middle of chaos right now, just know:
You can always start small.
You can always adapt.
You can always try something new.
This is your home, your flow, your rhythm.
And you’re doing an amazing job!
SUBSCRIBE FOR WEEKLY LIFE LESSONS
because every mom deserves a little extra magic in her inbox! ✨
We hate SPAM. We will never sell your information, for any reason.
